Sunday, September 30, 2012

Halloween Wreath

So, I found this idea on, where else? Pinterest. As usual, I found it months before I actually got around to making it so, I can't remember where to find the original to give credit but I am pretty sure there are many variations and mine is different in that I added my own little embellishments.

Now, first I went online and ordered the feather boas. I only ordered 2 at first but when I started wrapping the first wreath, I knew I was going to make a couple so, I went back and ordered more.

Like any wreath, many different things can be used. I opted to try one of the pool noodles I had seen as an idea when I did Easter wreaths. I tried cutting it in half to make 2 and I am not sure if I would do that again but, it worked.

I spray painted it black a little just in case some showed through and proceeded to wrap it in the boa.


I did wrap it kind of loose so that I had room to push the feathers apart a bit to add my fun stuff:)


i

Now at the $1 store I bought styrofoam balls and eyeball parts, but I also found these packs of skeleton straws that I thought would be cute on there too. I just slid the skeletons off the straws and since they were in 2 parts, just hot glued them together. Then I hot glued the eyes onto the styrofoam balls and used my hot glue to glue sets of eye balls together.


Now that I have everything ready, it was just a matter of placement and arranging. This one is for my son's classroom so I didn't want it to be TOO scary, but I think I managed a fun holiday look.


Of course I was so busy planning the wreath itself, I forgot to add the hanging ribbon first, another little gem I found at the $1 store, but I just pushed the boa apart enough at the top that I could twist the wire edge ribbon and wrap around, then pushed the boa back together to "hide" where I added it.


Of course this pic doesn't show where I "fixed" the spacing better but, you get the idea. On the next one I will make a hole through the noodle, push the ribbon through and just knot it to hold it in firm. 

I always find 100 more idea for each thing I make but....this one sure is fun and I know his class will love it. Once I had all the materials together, I spent less than 45 minutes putting it together and adjusting it all.

SUPER fun! Yes I am aware I am a geek but a creative geek. And that is a good thing! lol

Sunday, September 9, 2012

Ahead of schedule for Veteran's Day decorations

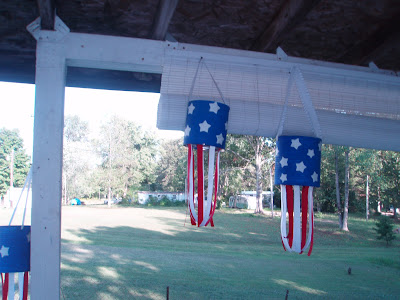
Honestly, I had planned to have these done by 4th of July but, well, I got them done now.

These adorable little cans I found on this blog were super easy and cheap to do. I couldn't find CHEAP spray paint in the right blue so I just dusted some cans I have been saving (coffee, hot chocolate, I save pretty much everything) in white spray paint and then gave them a quick coat in my acrylic blue.

Took a nail and tapped a couple holes in each one...didn't measure or anything.

I had found a star shaped cutter at Goodwill months ago and it came in handy. I just cut a bunch of white paper, I tried card stock but it was difficult and didn't look as good on the cans. I used regular glue to put the stars on, will coat it all with clear spray paint when I am done.

I found the ribbon at the $1 store if you can believe it and the first one I just randomly glued my strands, after that I cut a piece of cardboard and spaced the ribbons more carefully, then just hot glued the cardboard strip  to the inside bottom edge of the can.

I had bought these kind of frilly elastic headbands that never stayed in place in my hair so they have been living in my "potential crafting"pile for a while. I cut the little metal fastener in the middle with wire snips and poked them in the holes, securing on the inside surface with hot glue, totally cute! The others I just used white ribbon.

Anywho, I am going to make more, I certainly have the cans and I find each one gets better.

Sorry I don't have pics of the process, I will try to add some when I do another round.


I even thought about adding some glitter or maybe some blue beads at the bottom of the ribbons but couldn't find a pack of just blue ones. Sometimes, less is more anyway right? I will try to add photos of the process later.
Enjoy!